auto-cpufreq
Automatic CPU speed & power optimizer for Linux. Actively monitors laptop battery state, CPU usage, CPU temperature, and system load, ultimately allowing you to improve battery life without making any compromises.
For tl;dr folks:
Youtube: auto-cpufreq v2.0 release & demo of all available features and options
Youtube: auto-cpufreq - tool demo
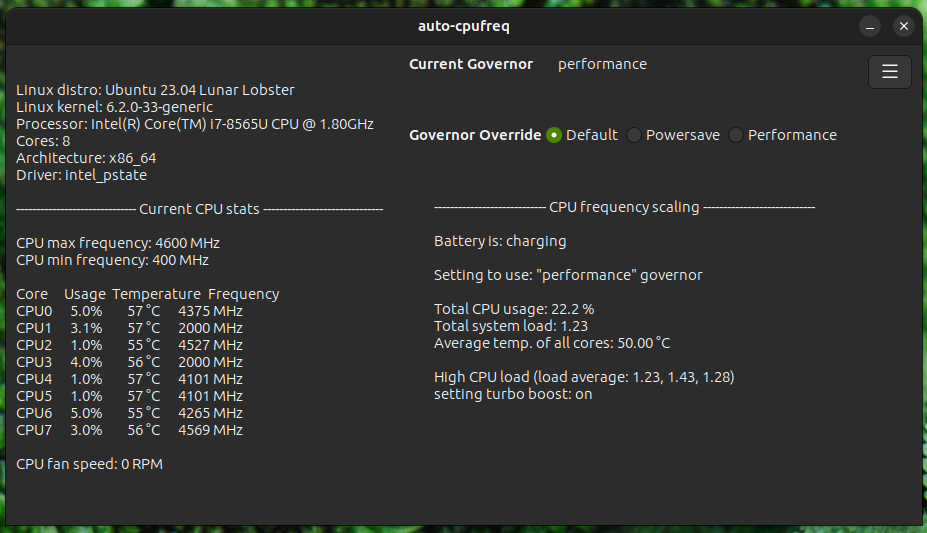
Example of auto-cpufreq GUI (available >= v2.0)

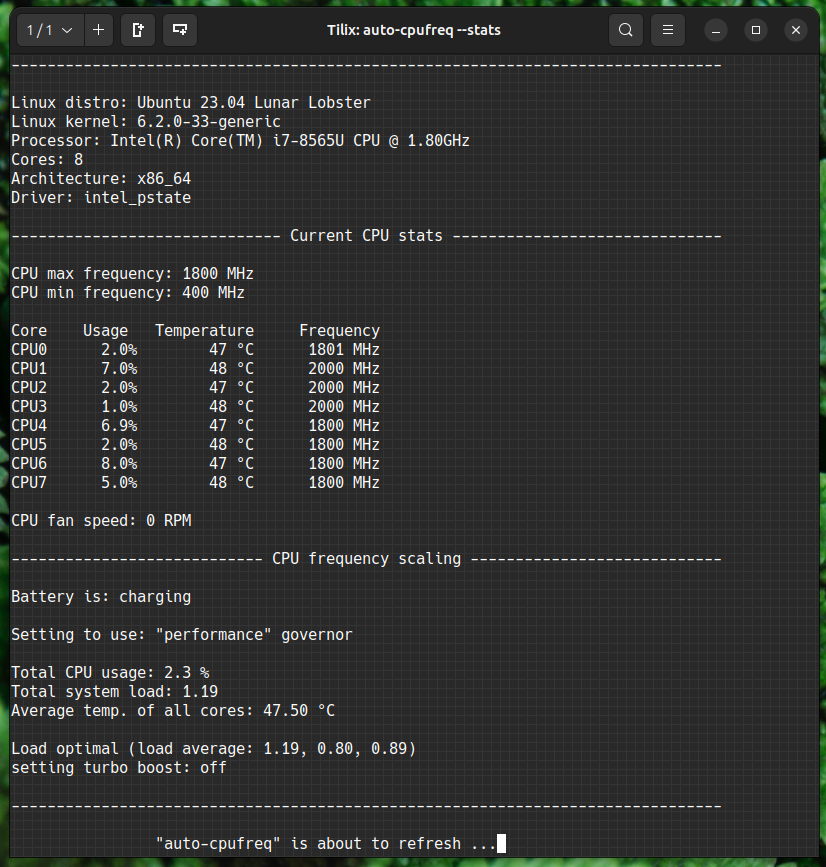
Example of auto-cpufreq --stats CLI output

Looking for developers and co-maintainers
- If you would like to discuss anything regarding auto-cpufreq or its development, please join the auto-cpufreq Discord server!
- auto-cpufreq is looking for co-maintainers & open source developers to help shape the future of the project!
Index
- Why do I need auto-cpufreq?
- Features
- Installing auto-cpufreq
- Post-installation
- Configuring auto-cpufreq
- How to run auto-cpufreq
- auto-cpufreq modes and options
- Battery charging thresholds
- Troubleshooting
- Discussion
- Donate
Why do I need auto-cpufreq?
One of the problems with Linux today on laptops is that the CPU will run in an unoptimized manner which will negatively impact battery life. For example, the CPU may run using the "performance" governor with turbo boost enabled regardless of whether it's plugged into a power outlet or not.
These issues can be mitigated by using tools like indicator-cpufreq or cpufreq, but those still require manual action from your side which can be daunting and cumbersome.
Tools like TLP (which I used for numerous years) can help extend battery life, but may also create their own set of problems, such as losing turbo boost.
Given all of the above, I needed a simple tool that would automatically make CPU frequency-related changes and save battery life, but let the Linux kernel do most of the heavy lifting. That's how auto-cpufreq was born.
Please note: auto-cpufreq aims to replace TLP in terms of functionality, so after you install auto-cpufreq it's recommended to remove TLP. Using both for the same functionality (i.e., to set CPU frequencies) will lead to unwanted results like overheating. Hence, only use both tools in tandem if you know what you're doing.
One tool/daemon that does not conflict with auto-cpufreq in any way, and is even recommended to have running alongside, is thermald.
Supported architectures and devices
Only devices with an Intel, AMD, or ARM CPU are supported. This tool was developed to improve performance and battery life on laptops, but running it on desktops/servers (to lower power consumption) should also be possible.
Features
- Monitoring
- Basic system information
- CPU frequency (system total & per core)
- CPU usage (system total & per core)
- CPU temperature (total average & per core)
- Battery state
- System load
- CPU frequency scaling, governor, and turbo boost management based on
- Battery state
- CPU usage (total & per core)
- CPU temperature in combination with CPU utilization/load (to prevent overheating)
- System load
- Automatic CPU & power optimization (temporary and persistent)
- Settings battery charging thresholds (limited support)
Installing auto-cpufreq
auto-cpufreq-installer
As auto-cpufreq relies on git based versioning, users are advised to install
auto-cpufrequsinggit clonemethod only. Downloading source code as a zip/from release will emit build error like these.
Get source code, run installer, and follow on-screen instructions:
git clone https://github.com/AdnanHodzic/auto-cpufreq.git
cd auto-cpufreq && sudo ./auto-cpufreq-installer
Snap Store
Please note: while all auto-cpufreq >= v2.0 CLI functionality will work as intended, the GUI won't be available on Snap package installs due to Snap package confinement limitations. Hence, please consider installing auto-cpufreq using auto-cpufreq-installer.
auto-cpufreq is available on the Snap Store or via CLI:
sudo snap install auto-cpufreq
Please note:
-
Make sure snapd is installed and
snap versionis >= 2.44 forauto-cpufreqto fully work due to recent snapd changes. -
Fedora users will encounter the following error due to
cgroups v2being in development. This problem can be resolved by either runningsudo snap run auto-cpufreqafter the snap installation or by using the auto-cpufreq-installer which doesn't have this issue.
AUR package (Arch based distributions)
The AUR Release Package is currently being maintained by MusicalArtist12, liljaylj, and parmjotsinghrobot.
Notices
- The Git Package is seperately maintained and was last updated on version 1.9.6.
- The build process links to
/usr/share/instead of/usr/local/share/ - The daemon installer provided does not work, instead start the daemon with
# systemctl enable --now auto-cpufreq
- The GNOME Power Profiles daemon is automatically disabled by auto-cpufreq-installer due to it's conflict with auto-cpufreq.service. However, this doesn't happen with AUR installs, which can lead to problems (e.g., #463) if not masked manually.
- Open a terminal and run
sudo systemctl mask power-profiles-daemon.service(thenenableandstartthe auto-cpufreq.service if you haven't already).
- Open a terminal and run
NixOS
Flakes
This repo contains a flake that exposes a NixOS Module that manages and offers options for auto-cpufreq. To use it, add the flake as an input to your flake.nix file and enable the module:
# flake.nix

{

    inputs = {
        # ---Snip---
        auto-cpufreq = {
            url = "github:AdnanHodzic/auto-cpufreq";
            inputs.nixpkgs.follows = "nixpkgs";
        };
        # ---Snip---
    }

    outputs = {nixpkgs, auto-cpufreq, ...} @ inputs: {
        nixosConfigurations.HOSTNAME = nixpkgs.lib.nixosSystem {
            specialArgs = { inherit inputs; };
            modules = [
                ./configuration.nix
                auto-cpufreq.nixosModules.default
            ];
        };
    }
}
Then you can enable the program in your configuration.nix file:
# configuration.nix

{inputs, pkgs, ...}: {
    # ---Snip---
    programs.auto-cpufreq.enable = true;
    # optionally, you can configure your auto-cpufreq settings, if you have any
    programs.auto-cpufreq.settings = {
    charger = {
      governor = "performance";
      turbo = "auto";
    };

    battery = {
      governor = "powersave";
      turbo = "auto";
    };
  };
    # ---Snip---
}
Nixpkgs
There is a nixpkg available, but it is more prone to being outdated, whereas the flake pulls from the latest commit. You can install it in your configuration.nix and enable the system service:
# configuration.nix

# ---Snip---
environment.systemPackages = with pkgs; [
    auto-cpufreq
];

services.auto-cpufreq.enable = true;
# ---Snip---
Installation (development mode only)
-
If you have
poetryinstalled:git clone https://github.com/AdnanHodzic/auto-cpufreq.git cd auto-cpufreq poetry install poetry run auto-cpufreq --help -
Alternatively, we can use an editable pip install for development purposes:
git clone https://github.com/AdnanHodzic/auto-cpufreq.git cd auto-cpufreq # set up virtual environment (details removed for brevity) pip3 install -e . auto-cpufreq -
Regularly run
poetry updateif you get any inconsistent lock file issues.
Post-installation
After installation, auto-cpufreq is available as a binary. Refer to auto-cpufreq modes and options for detailed information on how to run and configure auto-cpufreq.
Configuring auto-cpufreq
auto-cpufreq makes all decisions automatically based on various factors such as CPU usage, temperature, and system load. However, it's possible to perform additional configurations:
1: power_helper.py script (Snap package install only)
When installing auto-cpufreq via auto-cpufreq-installer, if it detects the GNOME Power Profiles service is running, it will automatically disable it. Otherwise, that daemon will cause conflicts and various other performance issues.
However, when auto-cpufreq is installed as a Snap package it's running as part of a container with limited permissions, hence it's highly recommended to disable the GNOME Power Profiles daemon using the power_helper.py script.
Please Note:
The power_helper.py script is located within the auto-cpufreq repo at auto_cpufreq/power_helper.py. In order to access it, first clone
the repository:
git clone https://github.com/AdnanHodzic/auto-cpufreq
Navigate to the directory where power_helper.py resides:
cd auto-cpufreq/auto_cpufreq
Make sure to have psutil Python library installed before next step:
sudo python3 -m pip install psutil
Then disable the GNOME Power Profiles daemon:
sudo python3 power_helper.py --gnome_power_disable
2: --force governor override
By default, auto-cpufreq uses balanced mode which works best for many systems and situations.
However, you can override this behaviour by switching to performance or powersave mode manually. The performance mode results in higher default frequencies, but also higher energy use (battery consumption) and should only be used if maximum performance is needed. The powersave mode does the opposite and extends battery life to its maximum.
See --force flag for more info.
3: auto-cpufreq config file
You can configure separate profiles for the battery and power supply. These profiles will let you pick which governor to use, as well as how and when turbo boost is enabled. The possible values for turbo boost behavior are always, auto, and never. The default behavior is auto, which only activates turbo during high load.
By default, auto-cpufreq does not use a config file. If you wish to configure auto-cpufreq statically, we look for a configuration file in the following order:
- Commandline argument:
--config <FILE>if passed as commandline argument toauto-cpufreq - User-specific configuration:
$XDG_CONFIG_HOME/auto-cpufreq/auto-cpufreq.conf - System-wide configuration:
/etc/auto-cpufreq.conf
Example config file contents
# settings for when connected to a power source
[charger]
# see available governors by running: cat /sys/devices/system/cpu/cpu0/cpufreq/scaling_available_governors
# preferred governor
governor = performance

# EPP: see available preferences by running: cat /sys/devices/system/cpu/cpu0/cpufreq/energy_performance_available_preferences
energy_performance_preference = performance

# minimum cpu frequency (in kHz)
# example: for 800 MHz = 800000 kHz --> scaling_min_freq = 800000
# see conversion info: https://www.rapidtables.com/convert/frequency/mhz-to-hz.html
# to use this feature, uncomment the following line and set the value accordingly
# scaling_min_freq = 800000

# maximum cpu frequency (in kHz)
# example: for 1GHz = 1000 MHz = 1000000 kHz -> scaling_max_freq = 1000000
# see conversion info: https://www.rapidtables.com/convert/frequency/mhz-to-hz.html
# to use this feature, uncomment the following line and set the value accordingly
# scaling_max_freq = 1000000

# turbo boost setting. possible values: always, auto, never
turbo = auto

# settings for when using battery power
[battery]
# see available governors by running: cat /sys/devices/system/cpu/cpu0/cpufreq/scaling_available_governors
# preferred governor
governor = powersave

# EPP: see available preferences by running: cat /sys/devices/system/cpu/cpu0/cpufreq/energy_performance_available_preferences
energy_performance_preference = power

# minimum cpu frequency (in kHz)
# example: for 800 MHz = 800000 kHz --> scaling_min_freq = 800000
# see conversion info: https://www.rapidtables.com/convert/frequency/mhz-to-hz.html
# to use this feature, uncomment the following line and set the value accordingly
# scaling_min_freq = 800000

# maximum cpu frequency (in kHz)
# see conversion info: https://www.rapidtables.com/convert/frequency/mhz-to-hz.html
# example: for 1GHz = 1000 MHz = 1000000 kHz -> scaling_max_freq = 1000000
# to use this feature, uncomment the following line and set the value accordingly
# scaling_max_freq = 1000000

# turbo boost setting (always, auto, or never)
turbo = auto

# battery charging threshold
# reference: https://github.com/AdnanHodzic/auto-cpufreq/#battery-charging-thresholds
#enable_thresholds = true
#start_threshold = 20
#stop_threshold = 80
How to run auto-cpufreq
auto-cpufreq should be run with with one of the following options:
-
- Monitor and see suggestions for CPU optimizations
-
- Monitor and automatically make (temporary) CPU optimizations
-
- Install/remove daemon for (permanent) automatic CPU optimizations
-
- Install daemon via GUI for (permanent) automatic CPU optimizations
-
- Update auto-cpufreq to the latest release
-
- Install daemon in "performance" mode
-
- View live stats of CPU optimizations made by daemon
-
- Force use of either the "powersave" or "performance" governor, or set to "reset" to go back to normal mode
-
config=TEXT
- Use config file at designated path
-
debug
- Show debug info (include when submitting bugs)
-
version
- Show currently installed version
-
- To support the project
-
help
- Shows all of the above options
-
completions=TEXT
- To support shell completions (current options are "bash", "zsh", or "fish")
Running auto-cpufreq --help will print the same list of options as above. Read auto-cpufreq modes and options for more details.
auto-cpufreq modes and options
Monitor
sudo auto-cpufreq --monitor
No changes are made to the system. This is solely to demonstrate what auto-cpufreq could do for your system.
Live
sudo auto-cpufreq --live
Necessary changes are temporarily made to the system over time, but this process and its changes are lost at system reboot. This mode is provided to evaluate how the system would behave with auto-cpufreq permanently running on the system.
Overriding governor
sudo auto-cpufreq --force=governor
Force use of either the "powersave" or "performance" governor, or set to "reset" to go back to normal mode. Please note that any set override will persist even after reboot.
Install - auto-cpufreq daemon
Necessary changes are made to the system over time and this process will continue across reboots. The daemon is deployed and started as a systemd service. Changes are made automatically and live stats are generated for monitoring purposes.
Install the daemon using CLI (after installing auto-cpufreq):
Installing the auto-cpufreq daemon using CLI is as simple as running the following command:
sudo auto-cpufreq --install
After the daemon is installed, auto-cpufreq is available as a binary and runs in the background. Its stats can be viewed by running: auto-cpufreq --stats
Please note: if the daemon is installed within a desktop environment, then its stats and options can be accessed via CLI or GUI. See "Install the daemon using GUI" below for more details.
Install the daemon using GUI
Starting with >= v2.0 after installing auto-cpufreq, an auto-cpufreq desktop entry (icon) is available, i.e.:
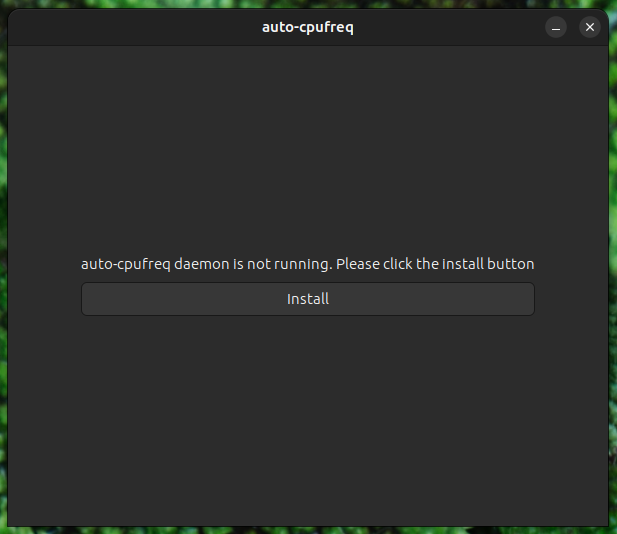
After selecting it to open the GUI, the auto-cpufreq daemon can be installed by clicking the "Install" button:

After that, the full auto-cpufreq GUI is available:

Please note: after the daemon is installed (by any method), its stats and options are accessible via both CLI and GUI.
auto-cpufreq daemon service
Installing the auto-cpufreq daemon also enables the associated service (equivalent to systemctl enable auto-cpufreq), causing it to start on boot, and immediately starts it (equivalent to systemctl start auto-cpufreq).
Since the daemon is running as a systemd service, its status can be seen by running:
systemctl status auto-cpufreq
If installed via Snap package, daemon status can be viewed as follows:
systemctl status snap.auto-cpufreq.service.service
Update - auto-cpufreq update
Update functionality works by cloning the auto-cpufreq repo, installing it via auto-cpufreq-installer, and performing a fresh auto-cpufreq daemon install to provide the latest version's changes.
Update auto-cpufreq by running: sudo auto-cpufreq --update. By default, the latest revision is cloned to /opt/auto-cpufreq/source, thus maintaining existing directory structure.
Update and clone to a custom directory by running: sudo auto-cpufreq --update=/path/to/directory
Remove - auto-cpufreq daemon
The auto-cpufreq daemon, its systemd service, and all its persistent changes can be removed by running:
sudo auto-cpufreq --remove
This does, in part, the equivalent of systemctl stop auto-cpufreq && systemctl disable auto-cpufreq, but the above command should be used instead of using systemctl.
Please note: after the daemon is removed, the auto-cpufreq GUI and desktop entry (icon) are also removed.
Stats
If the daemon has been installed, live stats of CPU/system load monitoring and optimization can be seen by running:
auto-cpufreq --stats
Battery charging thresholds
As of v2.2.0, battery charging thresholds can be set in the config file. This enforces your battery to start and stop charging at defined values
Supported devices
- Lenovo ThinkPad (thinkpad_acpi)*
- Lenovo IdeaPad (ideapad_acpi)*
*Please note, your laptop must have an installed ACPI kernel driver specific to the manufacturer. To check if you have the correct module installed and loaded run lsmod [module]
To request that your device be supported, please open an issue. In your issue, make us aware of the driver that works with your laptop
Battery config
Edit the config at /etc/auto-cpufreq.conf
Example config for battery (already part of example config file)
[battery]
enable_thresholds = true
start_threshold = 20
stop_threshold = 80
Lenovo_laptop conservation mode
this works only with lenovo_laptop kernel module compatable laptops.
add ideapad_laptop_conservation_mode = true to your auto-cpufreq.conf file
Troubleshooting
Q: If after installing auto-cpufreq you're (still) experiencing:
- high CPU temperatures
- CPU not scaling to minimum/maximum frequencies
- suboptimal CPU performance
- turbo mode not available
A: If you're using the intel_pstate/amd-pstate CPU management driver, consider changing it to acpi-cpufreq.
This can be done by editing the GRUB_CMDLINE_LINUX_DEFAULT params in /etc/default/grub. For instance:
    sudo nano /etc/default/grub
    # make sure you have nano installed, or you can use your favorite text editor
For Intel users:
GRUB_CMDLINE_LINUX_DEFAULT="quiet splash intel_pstate=disable"
For AMD users:
GRUB_CMDLINE_LINUX_DEFAULT="quiet splash initcall_blacklist=amd_pstate_init amd_pstate.enable=0"
Once you have made the necessary changes to the GRUB configuration file, you can update GRUB by running sudo update-grub on Debian/Ubuntu, sudo grub-mkconfig -o /boot/grub/grub.cfg on Arch Linux, or one of the following on Fedora:
sudo grub2-mkconfig -o /etc/grub2.cfg
sudo grub2-mkconfig -o /etc/grub2-efi.cfg
    sudo grub2-mkconfig -o /boot/grub2/grub.cfg
    # legacy boot method
For systemd-boot users:
    sudo nano /etc/kernel/cmdline
    # make sure you have nano installed, or you can use your favorite text editor
For Intel users:
quiet splash intel_pstate=disable
For AMD users:
quiet splash initcall_blacklist=amd_pstate_init amd_pstate.enable=0
Once you have made the necessary changes to the cmdline file, you can update it by running sudo reinstall-kernels.
AUR
- If the AUR installer does not work for your system, fallback to
auto-cpufreq-installerand open an issue.
Discussion:
Donate
Showing your support and appreciation for the auto-cpufreq project can be done in two ways:
- Financial donation
- Code contribution
Financial donation
If auto-cpufreq helped you out and you find it useful, show your appreciation by donating (any amount) to the project!
PayPal
BitCoin
bc1qlncmgdjyqy8pe4gad4k2s6xtyr8f2r3ehrnl87
Code contribution
Other ways of supporting the project consist of making a code or documentation contribution. If you have an idea for a new feature or you want to implement some of the existing feature requests or fix some of the bugs & issues, please make your changes and submit a pull request. I'll be glad to review it and, if your changes are accepted, you'll be credited on the releases page.
Please note: auto-cpufreq is looking for co-maintainers & open source developers to help shape the future of the project!


